
This page will walk through all the parts of the code that have to do with LEDs. The rest of the code related to the clock and button functionality will be skipped on this page but covered on the other pages in this section.
Include libraries and define global variables
Include libraries and other files in this repository. FastLED is an external library that lets us interact with LEDs and set them to different colors. Digit.h and LEDGrid.h are internal files that contain more globals and standalone class definitions.
#include <FastLED.h>   // Arduino libraries manager

#include "Digit.h" // Pixel arrangements for the numbers 0-9
#include "LEDGrid.h"
Note: .ino files don’t need to be included. All .ino files are automatically concatenated together into one big file when you compile.
Define the global variables
// LED variables
#define LED_PIN 13                // pin D13 on the ESP32
#define BRIGHTNESS 200            // 0-255
#define WIDTH 16                  // number of pixels across
#define HEIGHT 5                  // number of pixels high
#define NUM_LEDS (WIDTH * HEIGHT) // total number of pixels

#define START_PIXEL LEDGrid::TOP_LEFT // or LEDGrid::BOTTOM_LEFT
LED code structure
In the setup() function, tell the FastLED library which pin to read from, to use the leds array, and how many LEDs there are.
void setup() {
  // ...

  FastLED.addLeds<WS2812B, LED_PIN, GRB>(leds[0], NUM_LEDS);

  // ...
}
In the main loop function, set all LEDs to black to start with a clean slate, then call to showClockLEDs to figure out which pixels to turn on to display the clock, then tell FastLED to show those pixels.
void loop() {
  // Set all LEDs to black
  FastLED.clear();

  // ...

  // Set the LED pixels to rainbow colored digits
  showClockLEDs();

  // Set the two pixels to show the colon
  showColonLEDs();

  // Tell the FastLED library to show your data
  FastLED.show();
}
leds.ino
The leds.ino file contains functions related to setting the right pixels on the grid to different colors.
Why are these functions not on the LEDGrid class?
These functions are defined outside the LEDGrid class to keep it free of any clock-related dependencies, making it reusable for other projects. The functions in leds.ino mix LED and clock-specific functionality, including references to clock-related items like isHourDigit1Visible and Digit. If these functions were incorporated into the LEDGrid class, it would restrict the class to clock-based applications. By keeping LEDGrid independent of clock functionality, the Rainbow Clock can be reprogrammed to perform entirely different tasks—-like running a ‘snake’ game—-while still using LEDGrid as-is, without any modifications.
showClockLEDs
At this point, we can access the four individual digits of the clock with the c object. (The way those variables are set is covered in How the clock code works.) This function showClockLEDs(), goes through each of the four digits, checks if the digit is hidden (ie. if it’s hidden while flashing in edit mode), and if it’s not hidden, calls the next function in this file showDigitLEDs to show that individual digit, specifying one of the four digit positions.
void showClockLEDs() {
  // Set the LEDs for each individual digit, if it's not hidden (ie. if it's
  // not currently flashing in edit mode)
  if (c.isHourDigit1Visible()) {
    showDigitLEDs(c.getHourDigit1(), DIGIT_1_COLUMN);
  }
  if (c.isHourDigit2Visible()) {
    showDigitLEDs(c.getHourDigit2(), DIGIT_2_COLUMN);
  }
  if (c.isMinuteDigit1Visible()) {
    showDigitLEDs(c.getMinuteDigit1(), DIGIT_3_COLUMN);
  }
  if (c.isMinuteDigit2Visible()) {
    showDigitLEDs(c.getMinuteDigit2(), DIGIT_4_COLUMN);
  }
}
showDigitLEDs
Each digit takes up a 3x5 grid of pixels. These 3x5 grids are defined in Digit.h. This function loops through each pixel in a digit and assigns it to it’s corresponding pixel in the leds grid.
void showDigitLEDs(int digit, int startColumn) {
  // Get a 3x5 mapping of which pixels to display for this digit
  Digit d = digits[digit];

  // Loop through this 3x5 array pixels and set the LEDs
  for (int x = 0; x < DIGIT_WIDTH; x++) {
    for (int y = 0; y < DIGIT_HEIGHT; y++) {
      // The pixels array tells us to show this LED or set it to Black
      if (d.showPixel(x, y)) {
        leds(startColumn + x, y) = getColor(startColumn + x);
      } else {
        leds(startColumn + x, y) = CRGB::Black;
      }
    }
  }
}
Digit.h
Each digit is a two-dimensional array of 0s and 1s. This screenshot shows the 1s highlighted. We can loop through these 2d arrays of “pixels” and check if the corresponding LED should be lit.
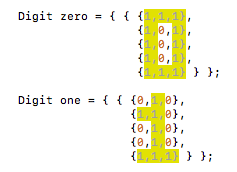
We store this 2d array of pixels in the Digit struct.
struct Digit {
  bool pixels[DIGIT_HEIGHT][DIGIT_WIDTH];
  bool showPixel(int x, int y) {
    return pixels[DIGIT_HEIGHT - y - 1][x];
  }
};
The function showPixel returns whether a pixel in the 3x5 digit grid should be lit. It swaps the (x, y) syntax to [y][x] because the pixel arrays are organized row-then-column. It also flips the y value because the pixels are stored top-to-bottom, and the clock pixels are rendered bottom-to-top.
Then we take all the Digit objects 0-9 and make a global array digits.
Digit digits[] = {zero, one, two, three, four, five, six, seven, eight, nine};getColor
Get a color of the rainbow according to which column we’re on. Map the current column 0 -> 16 to a hue 0 -> 255
CHSV getColor(int column) {
  int hue = map(column, 0, WIDTH, 255, 0);
  return CHSV(hue, 255, BRIGHTNESS);
}
First, use the map() function to convert the column to a hue. The Arduino map() function is a handy Arduino built-in function that lets you convert a value from a starting range to a destination range. Here, we’re mapping the column from it’s range 0-WIDTH (which is 16) to the range of a hue 0-255. For example, when column is 2, hue becomes 32.
Then we pass the hue to a FastLED function CHSV() to create an HSV color (CHSV documentation). In the FastLED library, hue, saturation, and value are all values between 0-255 but a typical HSV color has different ranges. Hue is usually a value 0-360 (as in 360 degrees on a color wheel), and saturation and value are usually a percentage 0-100. Here we set the saturation to it’s max of 255 and brightness to the global BRIGHTNESS variable we defined at the very beginning of the rainbow clock program.
showColonLEDs
If the colon is flashed on, set those 2 LEDs to white. In the main file, we defined the COLON_COLUMN to be column 8. This function sets the pixels in that column on rows 1 and 3.
void showColonLEDs() {
  // If the colon is flashed on, set the 2 LEDs to white in the middle column,
  // rows 1 and 3
  if (c.isColonVisible()) {
    CHSV white = CHSV(0, 0, BRIGHTNESS);
    leds(COLON_COLUMN, 1) = white;
    leds(COLON_COLUMN, 3) = white;
  }
}
LEDGrid.h class
This class lets us reference the LEDs conveniently with syntax like leds(x, y) = color. The main part of the code is the function xyCoordsToIndex which converts x, y coordinates to an index on the one-dimensional array that snakes back and forth on the grid, which is how FastLED stores LED data.
The LEDGrid object is defined like this in the main rainbow-clock.ino file:
LEDGrid leds(WIDTH, HEIGHT, START_PIXEL);Private and public variables
Define private variables. These cannot be accessed outside of this class.
class LEDGrid {

private:
  int _width;                    // number of pixels across
  int _height;                   // number of pixels high
  int _startPixel = BOTTOM_LEFT; // the first pixel on the subgrid, either
                                 // BOTTOM_LEFT or TOP_LEFT
  CRGB *_leds;                   // pointer to the LED array
The FastLED leds array is usually defined with this syntax: CRGB leds[NUM_LEDS]. That syntax will allocate the amount of memory needed for the array. It requires NUM_LEDS to be a static variable so it knows how much memory to allocate. But since this class is flexible enough to accept different grid dimensions, we want our _leds size to be _width * _height, which are both dynamic variables whose values aren’t known at first. Instead, we can define a pointer with the syntax *_leds, which doesn’t allocate any memory, but instead points to memory. Then we allocate the memory later when we know the value of _width and _height. This happens in the constructor, using the new operator (see next section).
The public variables in this class are BOTTOM_LEFT and TOP_LEFT, which are the two different positions of the starting pixel on the grid.
public:
  static constexpr int BOTTOM_LEFT = 0;
  static constexpr int TOP_LEFT = 1;
Constructor
The class constructor sets the width, height, and start pixel. It also allocates the size of the LED array in memory that the pointer _leds points to.
LEDGrid(int width, int height, int startPixel) {
  _width = width;
  _height = height;
  _startPixel = startPixel;
  _leds = new CRGB[_width * _height];
}
[] and () operators
The [] operator lets us reference the LEDGrid object with the syntax leds[i]. This is used in the setup() function where FastLED.addLEDs is called, where we tell FastLED our LED array variable.
struct CRGB *operator[](int i) {
  return (&_leds[i]);
}
The () operator lets us reference the LEDGrid object with the syntax leds(x, y). It coverts the x and y values to the corresponding index on the one-dimensional FastLED _leds array.
struct CRGB &operator()(int x, int y) {
  return _leds[_xyCoordsToIndex(x, y)];
}
Convert x y coordinates to an index
The LEDs are wired as one long strand that snakes back and forth. In order to reference this strand with x, y coordinates, we need to calculate the index. The equation varies slightly depending on the row and the start pixel.
The core equation to convert x, y to one long strand is y * width + x. But, we need to flip the x horizontally for odd rows because the strand snakes back and forth. And also, if the starting pixel is at the top, we need to flip all the y values vertically.
int _xyCoordsToIndex(int x, int y) {
  // For odd rows, flip the x value horizontally
  if (y % 2 == 1) {
    x = _flipHorizontal(x);
  }

  // If the start pixel is at the top, flip the y value vertically
  if (_startPixel == TOP_LEFT) {
    y = _flipVertical(y);
  }

  return y * _width + x;
}

// Given a column, returns the opposite column horizontally
int _flipHorizontal(int x) { return _width - x - 1; }

// Given a row, returns the opposite row vertically
int _flipVertical(int y) { return _height - y - 1; }